If you still have an asp.net website project in your company’s business, and you are still doing the same website compilation every day, opening the VS publishing website, and then copying to the server’s IIS via FTP or remote desktop, then this The article is specifically to solve this kind of problem. We know that the asp.net website may be published by most people by right-clicking in VS to publish to a local directory, and this article needs to tell you how to use Jenkins to solve these duplication of website publishing.

I have shared an article on how to deploy .net core to iis on my Chinese blog site, and realized that it will be automatically deployed to IIS by clicking publish directly in VS. For small and medium-sized projects, it is completely suitable and convenient for scenarios where the publishing frequency is not high. But when the number of projects on your website has increased, it is a bit inefficient to use this manual method to click a button to publish. So here to share the use of Jenkins continuous integration asp.net website and automatic deployment to IIS.
Related Reading:
- How to use VS 2019 to publish a .net core program and deploy it to IIS (Chinese)
- How to use IIS to publish and run ASP.NET Core applications (Chinese)
- The remote server returned 550 and failed to connect to the remote computer using the specified process Web Management Service (Chinese)
Why choose Jenkins continuous integration to deploy website?
Recent work is to solve these repetitive tasks, because when the official environment is launched, dozens of websites need to be deployed manually, which is very troublesome. Some friends may ask, how did so many websites survived before? The answer is to manually get it one by one, yes, it is done manually, so it takes a few hours or one or two days to publish the website each time. And halfway through, I can’t figure out what moths are.
So as someone who has aspirations, you may think that you need to spend some time to solve this pain point. From a company perspective, this saves manpower and time, and these are all wasted money, because you stay in the company for a minute. You have to pay the corresponding salary. Of course, it is not within the scope of the discussion to work free overtime without paying the money to draw a pie. At first, I tried to use Azure DevOps to build CI/CD, but I encountered too many problems in the middle and didn’t eat this bone. Later, I switched to Jenkins and finally solved this pain point.
Before I started using Jenkins to continuously integrate the ancient asp.net website, I also drove Google to search for some Chinese materials on the Internet. According to the online tutorials and personally tested the deployment, none of them were successful, so I had to explore it myself and tossed about it. Tian finally solved this problem, here only introduces the general core points and steps, some details are already a lot of information on the Internet, so I won’t introduce too much.
Jenkins continuous integration asp.net website website steps
- Jenkins environment installation
- Jenkins plugin installation
- Configure MSbuild
- New build Item
- Configure build task parameters
To use Jenkins to continuously integrate the website, in fact, you can also use Jenkins to continuously integrate asp.net web applications, asp.net mvc, asp.net core web applications, etc. Of course, other language projects such as java, php are also possible, Just install the corresponding plug-in and configure the environment.
Jenkins environment installation
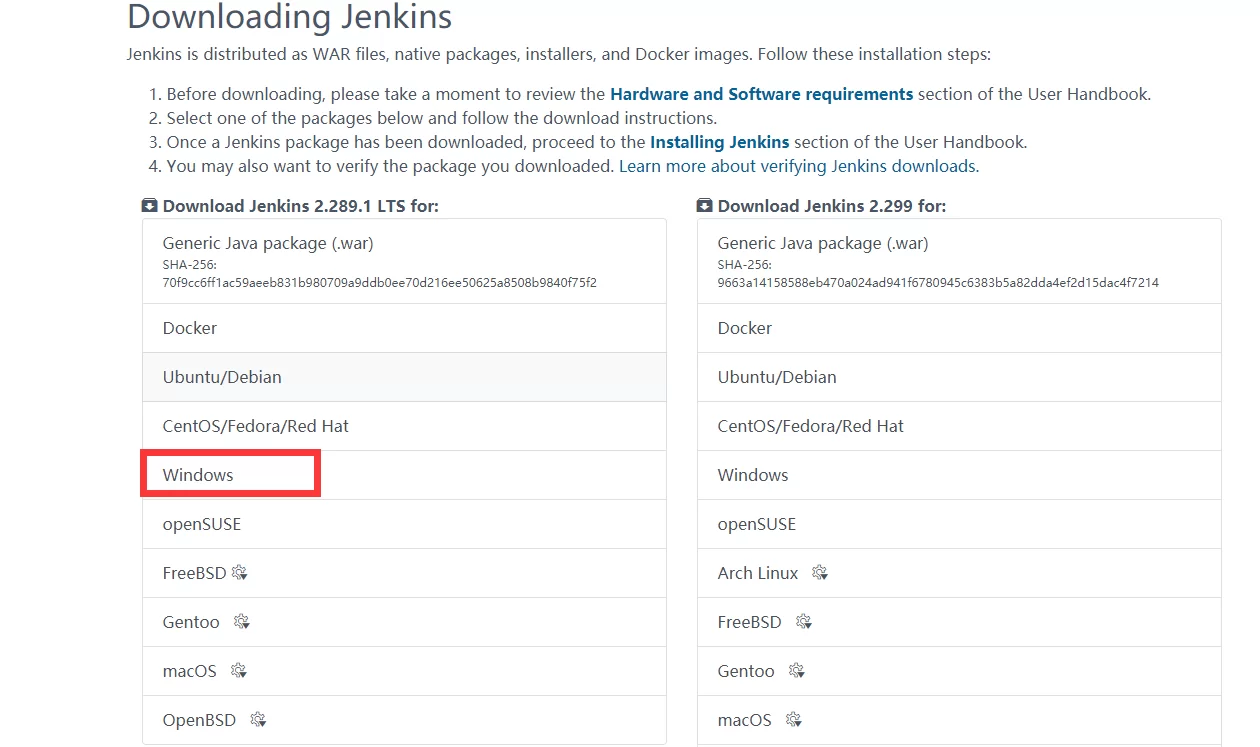
Go to the official website to download the latest Jenkins installation package. I use the Windows server to install Jenkins. Just install a kind of Next. There is no difficulty, and there are many tutorials on the Internet, so I won’t go into the details here. .
Jenkins download address: https://www.jenkins.io/download/
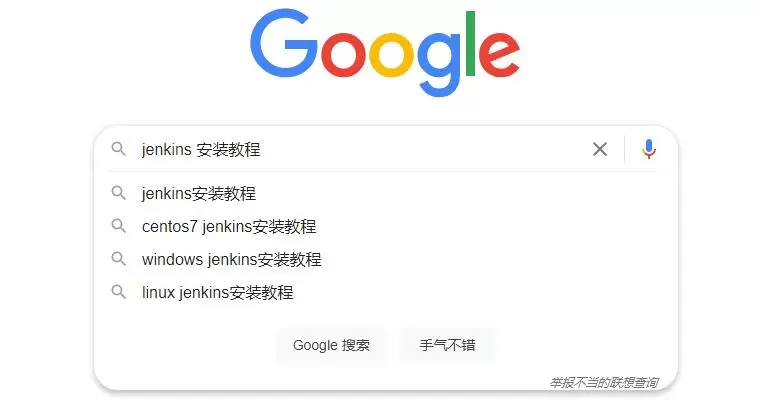
For more installation tutorials, you can use Google to search, type keywords as shown in the figure below:
Jenkins plugin installation
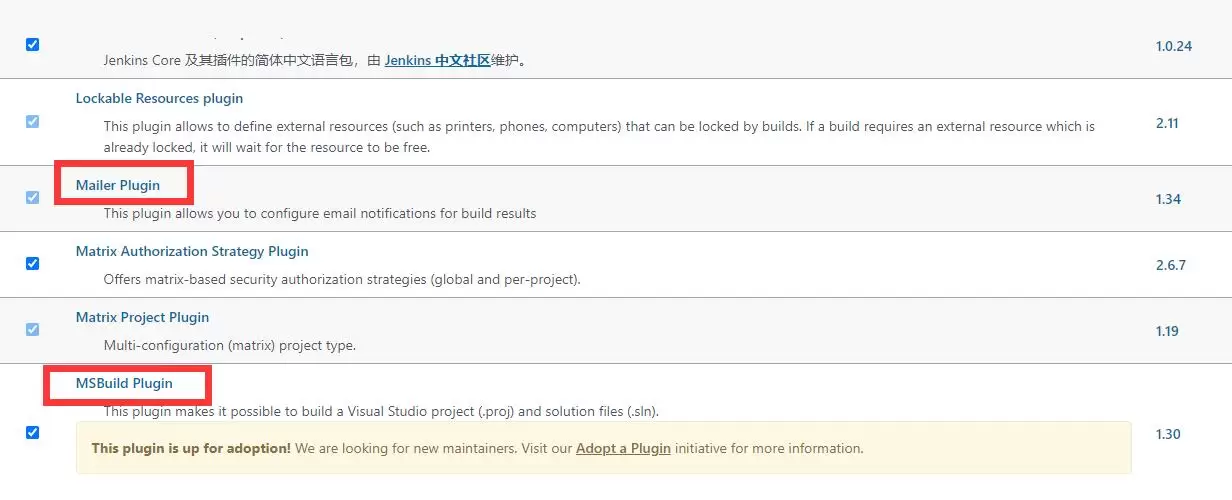
To build an ancient asp.net website website, you need to install some plug-ins, and you have to choose the corresponding plug-ins according to the source code management tools used in your project, such as using TFS, Team Foundation Server 2013, gitlab, etc., in general It is said that you need to install the plug-in for compiling the code (MSBuild Plugin), the plug-in for obtaining the source code (Git plugin, GitHub plugin, GitLab Plugin), and the plug-in for deploying the website. If you use docker, you also need to install the corresponding plug-in support.
Configure MSbuild
This step of configuring MSbuild is essential, otherwise the website code cannot be compiled, right? So after installing the corresponding plug-ins, the first thing to do is to configure MSbuild. Of course, you can also do it out of the order described here. The configuration is also done at the end, and it has no effect. It is best to operate in order. Practice, lest you make detours.
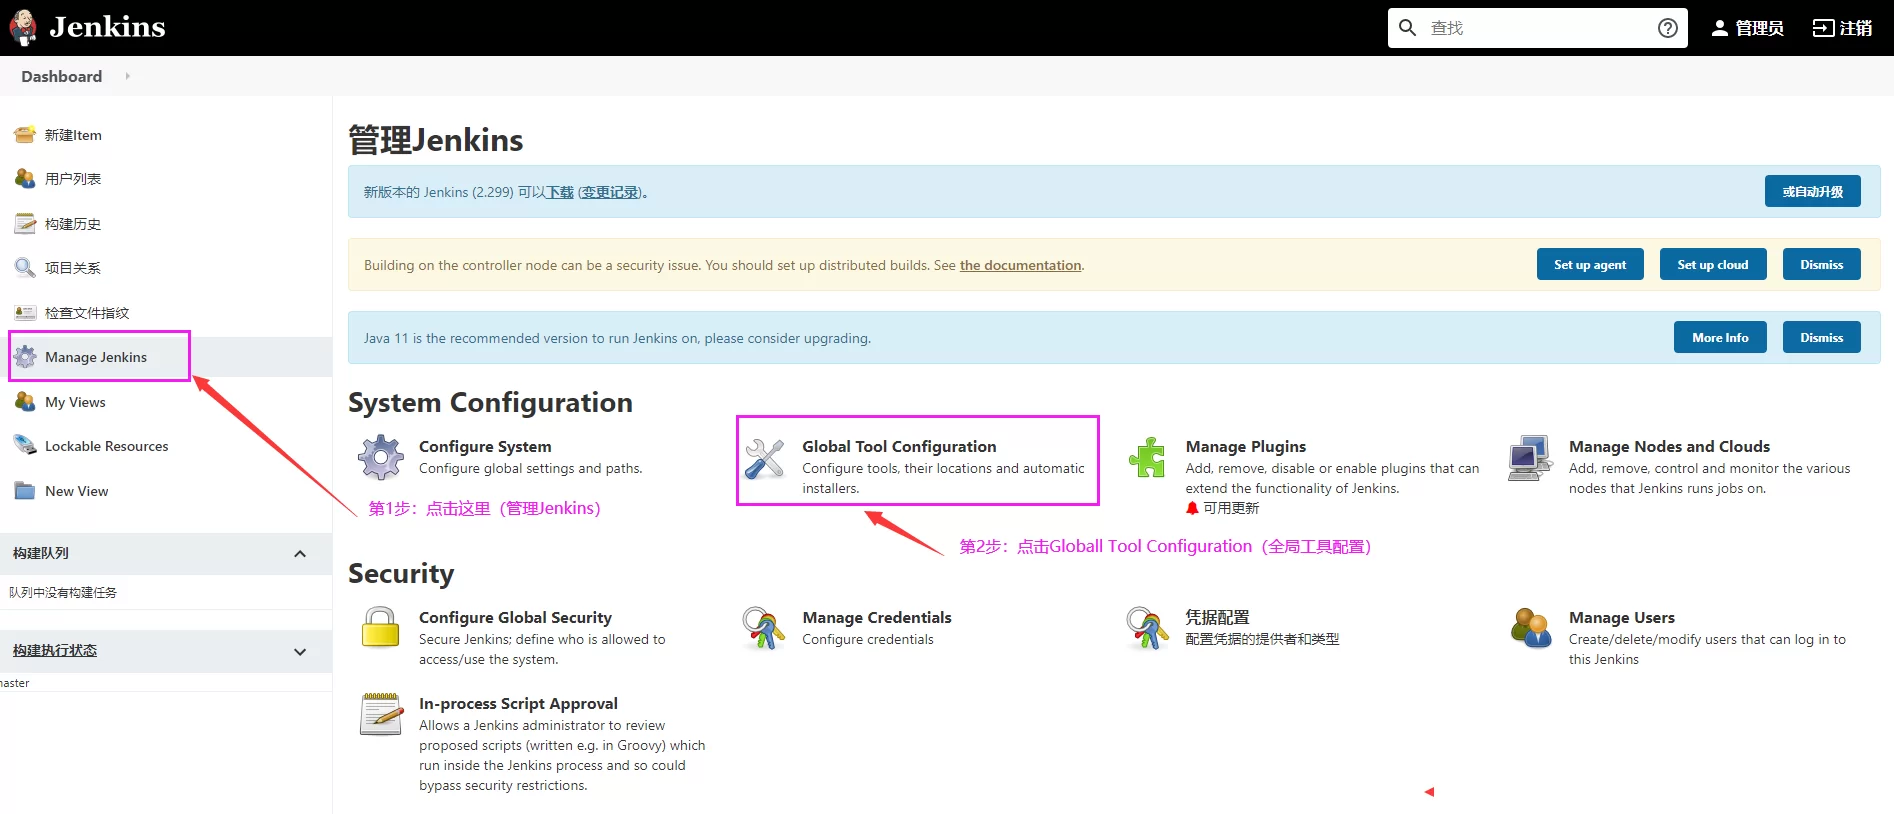
Step 1: Global tool configuration
After entering the background, click the menu on the left and operate as shown in the figure below.
Step 2: Set the MSbuild path
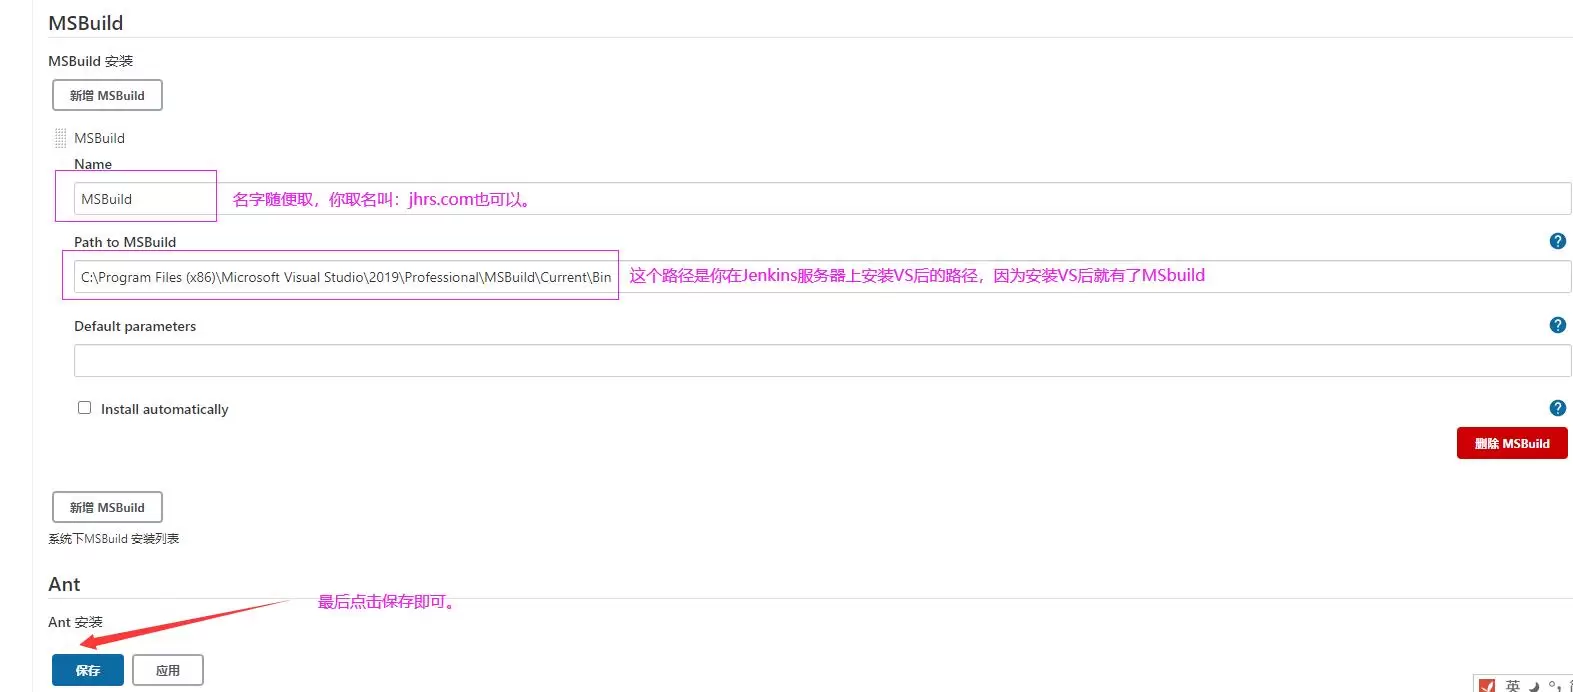
After clicking on the second step of the above figure, enter the configureTools interface (https://jhrs.com/configureTools displayed in the browser address bar) interface, and reach the position of MSbuild, as shown in the following figure:
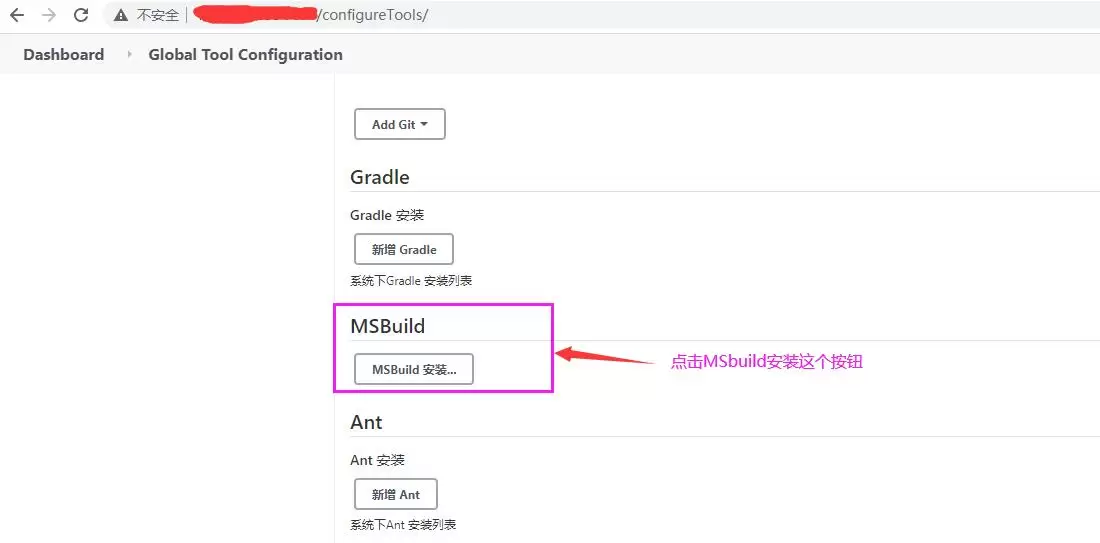
Fill in the MSbuild path, set the name and save it.
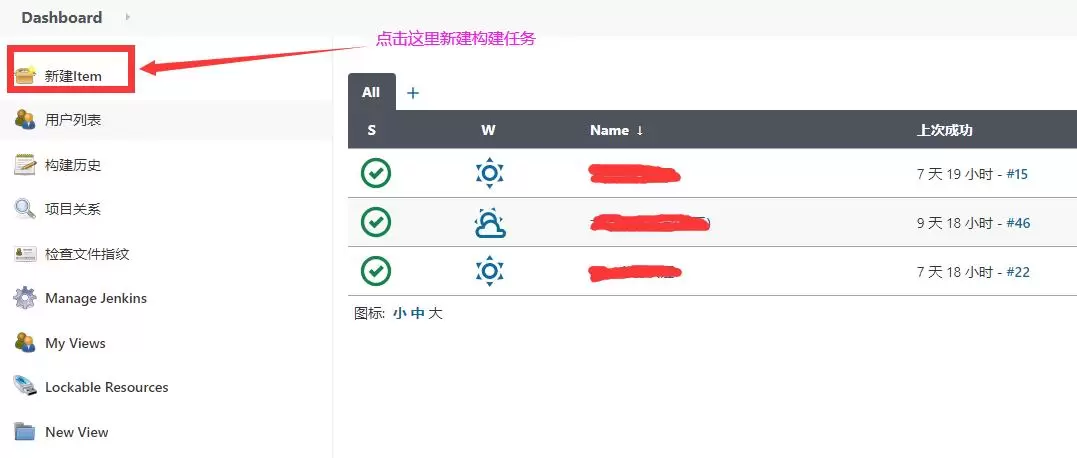
New Item
Use the administrator account to log in to Jenkins to enter the background, and you can see the new build task in the left menu, as shown in the following figure:
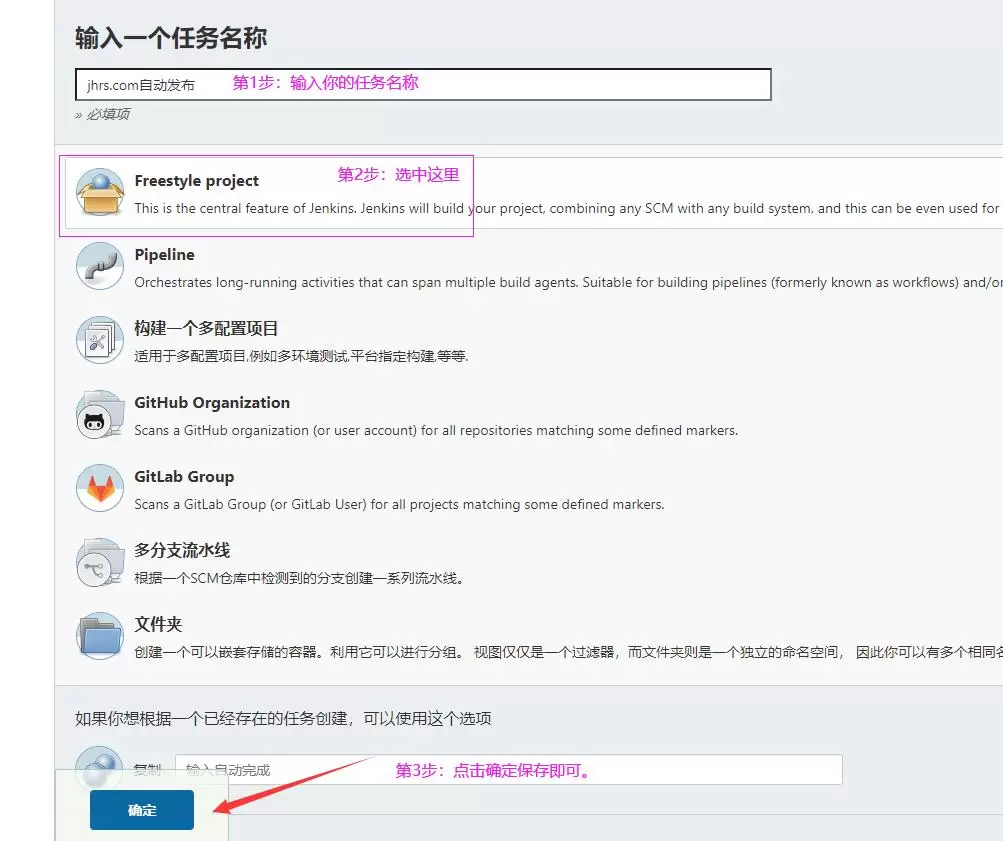
Click on the new item to jump to the page shown in the figure below, and operate according to the method given in the figure. Click on the picture to view the larger picture.
After saving, enter the last step. The last step contains more content and is also a more important step. The correct configuration is related to whether it can be automatically built and automatically deployed.
Configure build task parameters
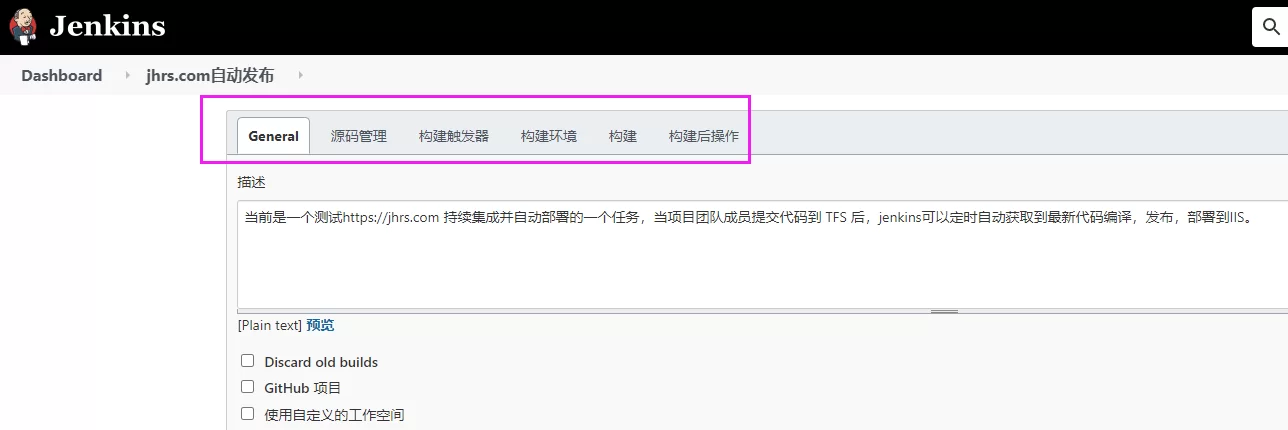
Configure the build task parameters as shown in the figure below, which is divided into 6 steps (General, source code management, build trigger, build environment, build, post-build operation):
General
General here is mainly to fill in some descriptive information. For example, the task I demonstrated here is: “Currently, it is a task of testing https://jhrs.com continuous integration and automatic deployment. After the project team members submit the code to TFS, jenkins The latest code can be compiled, released, and deployed to IIS automatically at regular intervals.”. When the project is finished, you can also choose to stop the build.
Source code management
The job of the source code management office is to tell Jenkins where to pull (obtain) the source code. If the company has built gitlab or TFS, or a source code management tool such as Team Foundation Server 2013, it will find the clone address of the corresponding project and copy it. Just fill it in. For example, an address I randomly filled in below: https://github.com/jhrscom/JHRS.git

If you can’t see git like the picture above, it means that the plug-in has not been installed, and then take a closer look at the introduction to the plug-in in this article.
Build trigger
The build trigger here is mainly to set the trigger rules. You can choose to actively build, that is, if there is code submission, the source code management tool will actively notify jenkins to build, or you can use timed builds, such as checking whether the latest code is submitted every 5 minutes, and if there is Just get the latest code build. You can think of it as an ajax polling request to query the server (source code management server) for updates.
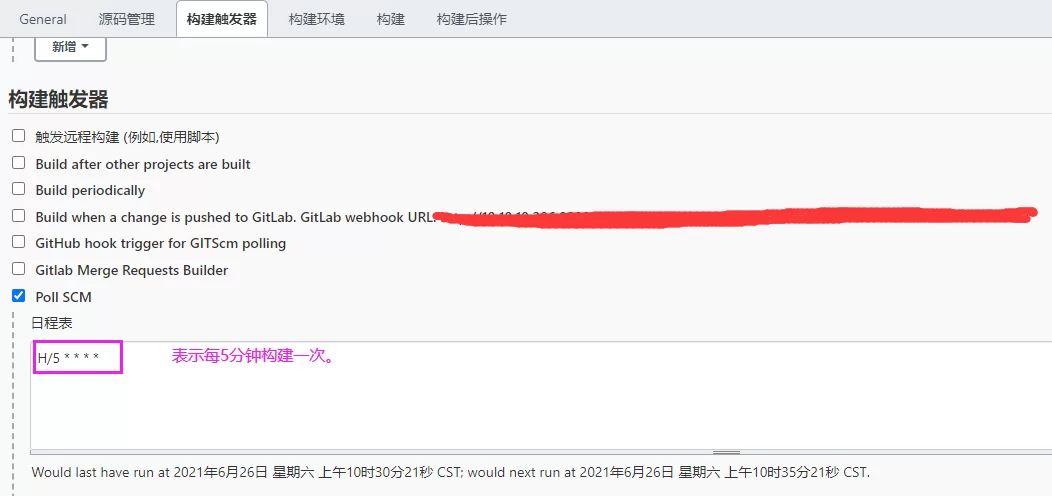
For the above H/5 * * * * time setting rules, please refer to this article
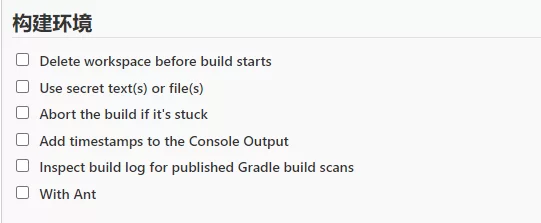
Build environment
Choose the build environment according to your own needs. If you don’t understand it, translate it or search on Google, and you’ll understand by looking at the official documentation.
Build (quite important settings)
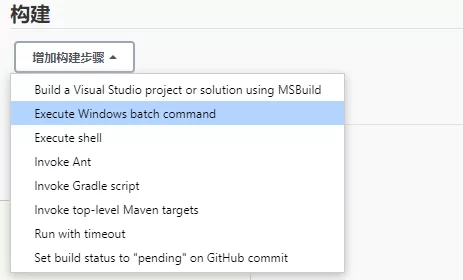
The setup here is very important and cannot be made wrong. Build the complete function provided here as shown below:
They are: use MSbuild to compile Visual Studio projects or solutions, execute Windows batch commands, execute shells, call Ant, call Gradle scripts, etc.
For projects developed in C#, such as website website, asp.net application, asp.net core website program, etc., you can restore the referenced third-party class library (dll) through nuget first, then compile and publish the project, and finally Steps to push to the test or official server to configure the build parameters.
Therefore, in building here, you need to execute the windows batch command (Execute Windows batch command) to call nuget to restore the third-party dll (otherwise the code will not be compiled), and then use MSbuild to compile the Visual Studio project or solution (Build a Visual Studio project) or solution using MSBuild), and finally execute a windows batch command to deploy the released files to the test or official server and it will be OK.
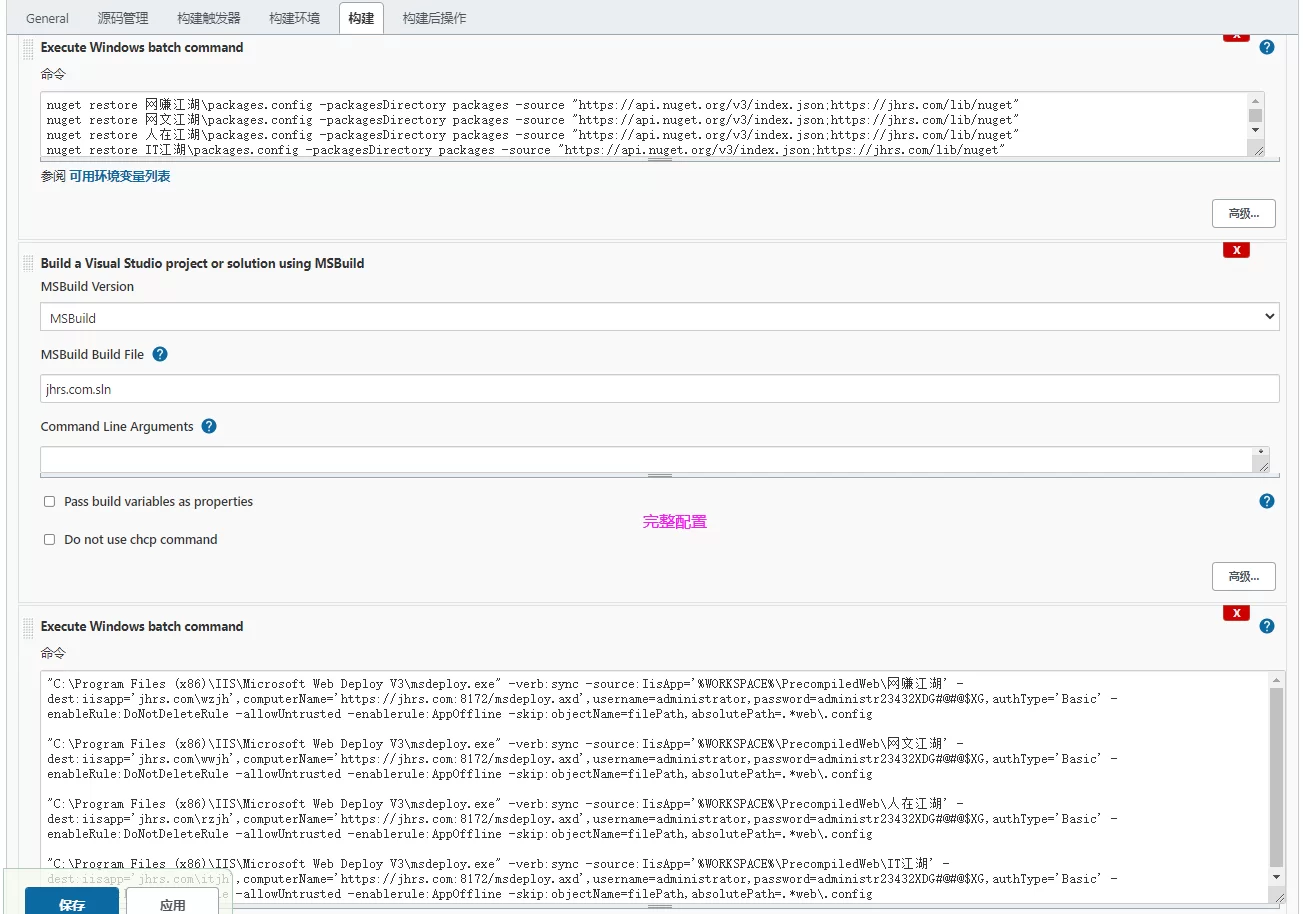
So what this article shares is to configure 3 commands, as shown in the following 3 figures.
nuget restore third party dll command
There are 4 commands above, indicating that you need to restore the referenced third-party dlls of 4 websites, and there are also the restoration addresses of internal libraries, which tells nuget where to get the dlls written by these companies (https://jhrs.com/ lib/nuget).
nuget restore 网赚江湖\packages.config -packagesDirectory packages -source "https://api.nuget.org/v3/index.json;https://jhrs.com/lib/nuget"
nuget restore 网文江湖\packages.config -packagesDirectory packages -source "https://api.nuget.org/v3/index.json;https://jhrs.com/lib/nuget"
nuget restore 人在江湖\packages.config -packagesDirectory packages -source "https://api.nuget.org/v3/index.json;https://jhrs.com/lib/nuget"
nuget restore IT江湖\packages.config -packagesDirectory packages -source "https://api.nuget.org/v3/index.json;https://jhrs.com/lib/nuget"
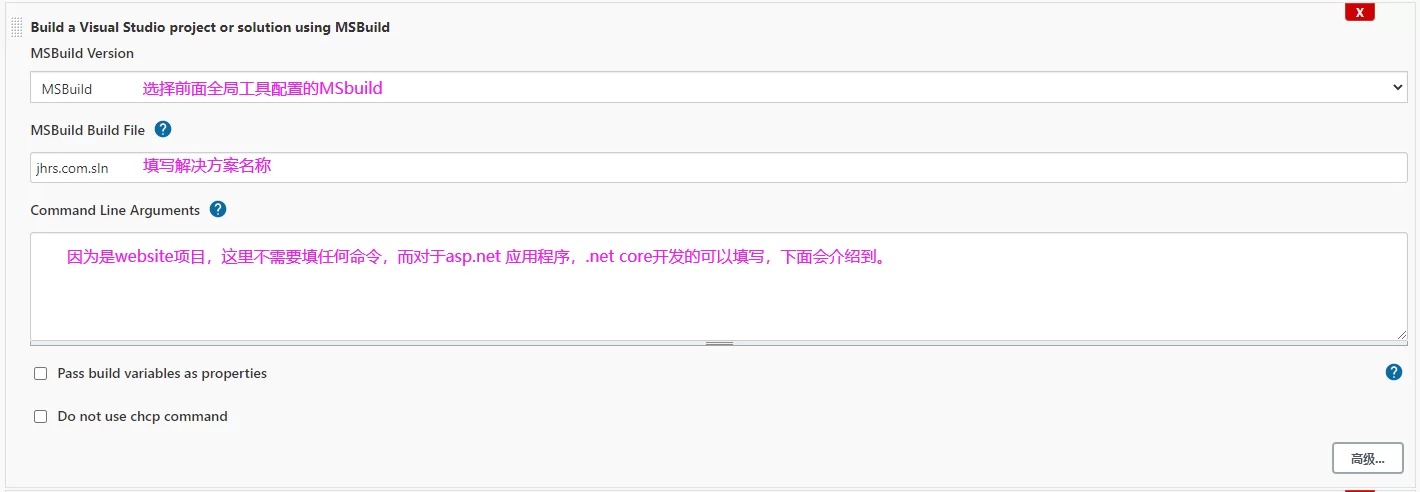
Use MSbuild to compile the website website
Some precautions have been explained in the figure above.
Jenkins automatically deploys the website to IIS
To use Jenkins to implement automatic deployment to IIS, you need to use the msdeploy.exe command. The complete configuration is shown in the following figure:
There are 4 commands above to deploy 4 websites respectively.
"C:\Program Files (x86)\IIS\Microsoft Web Deploy V3\msdeploy.exe" -verb:sync -source:IisApp='%WORKSPACE%\PrecompiledWeb\网赚江湖' -dest:iisapp='jhrs.com\wzjh',computerName='https://jhrs.com:8172/msdeploy.axd',username=administrator,password=administr23432XDG#@#@$XG,authType='Basic' -enableRule:DoNotDeleteRule -allowUntrusted -enablerule:AppOffline -skip:objectName=filePath,absolutePath=.*web\.config
- -source parameter: represents the file save path after Jenkins is compiled and released (refers to the website directory after release), %WORKSPACE% represents the working directory of Jenkins.
- -dest:iisapp parameter: indicates which website on the IIS server, jhrs.com is the main website, and wzjh is the virtual directory or application. computerName represents the server address. For internal use, you only need to replace the domain name with your IP address. The username and password that follow represent the user name and password for logging in to the server; for official use, you can create a separate deployment account.
- -enableRule parameter: enable DoNot delete rule
- -allowUntrusted parameter : more important, not adding this parameter will report an error due to security issues, which will be introduced separately below.
- -skip parameter: Ignore the file parameter, it is being published to the server, some files do not want to be updated to the server, you can use this parameter to ignore, this parameter can be used multiple times. You can ignore directories and files.
Keywords in this article: .net core latest deployment tutorial , .net core web api deployment to IIS , .net core deployment tutorial , .net core deployment to IIS , teach you how to deploy .net core programs .
The complete configuration is shown in the figure below:
Summary of some issues
If it is not a website project, but an asp.net application or a project developed by .net core, you can set the Command Line Arguments parameter to specify the compilation behavior of MSBuild when compiling MSBuild, such as:
/t:Rebuild /p:Configuration=Release;PublishProfile=configurationname;DeployOnBuild=true;VisualStudioVersion=11.0
/t:Build /p:Configuration=Release /p:WebProjectOutputDir=E:\mysite\jhrs.com /p:OutputPath=E:\mysite\jhrs.com\bin

/t:Rebuild /p:Configuration=Release /p:DeployOnBuild=true;PublishProfile=publishto jhrs.com /p:TargetFrameworkVersion=v4.7.2 /p:UserName=administrator /p:Password=jhrs.com 343#S.
Jenkins continuous integration asp.net website
Security errors encountered during automatic deployment:
C:\Users\Administrator>”C:\Program Files (x86)\IIS\Microsoft Web Deploy V3\msdeploy.exe” -verb:sync -source:IisApp=’E:\workspace\jhrs.com\PrecompiledWeb\Jianghu’ -dest:iisapp=’jhrs.com\wzjh’,computerName=’https://jhrs.com:8172/msdeploy.axd’,username=administrator,password=jhrs.com1s23!@e#,authType=’ Basic’ -enableRule:DoNotDeleteRule
Information: The ID “138c1b47-48d5-4488-98ca-cfcc5aca7732” is being used for the connection to the remote server.
Error code: ERROR_CERTIFICATE_VALIDATION_FAILED
More information: The specified process (“Web Management Service”) has been used to connect to the remote computer (“jhrs.com”), but the server’s certificate could not be verified. If you trust the server, please connect again and allow untrusted certificates. Learn more at: https://go.microsoft.com/fwlink/?LinkId=221672#ERROR_CERTIFICATE_VALIDATION_FAILED.
Error: The underlying connection has been closed: The trust relationship could not be established for the SSL/TLS secure channel.
Error: According to the verification process, the remote certificate is invalid.
Error count: 1.
If you encounter the above error, you need to add the -allowUntrusted parameter to the deployment command.
"C:\Program Files (x86)\IIS\Microsoft Web Deploy V3\msdeploy.exe" -verb:sync -source:IisApp='%WORKSPACE%\PrecompiledWeb\网赚江湖' -dest:iisapp='jhrs.com\wzjh',computerName='https://jhrs.com:8172/msdeploy.axd',username=administrator,password=administr23432XDG#@#@$XG,authType='Basic' -enableRule:DoNotDeleteRule -allowUntrusted -enablerule:AppOffline -skip:objectName=filePath,absolutePath=.*web\.config
Jenkins continuous integration asp.net website
Regarding this issue, you can refer to the official Microsoft documentation .
nuget path problem
The nuget path is wrong. Please specify the full path. The relative path is used in this article, that is, I put nuget.exe in the working directory of jenkins. For example, the full path is written as:
f:\mysite\nuget.exe restore 网赚江湖\packages.config -packagesDirectory packages -source "https://api.nuget.org/v3/index.json;http://jhrs.com/lib/nuget"
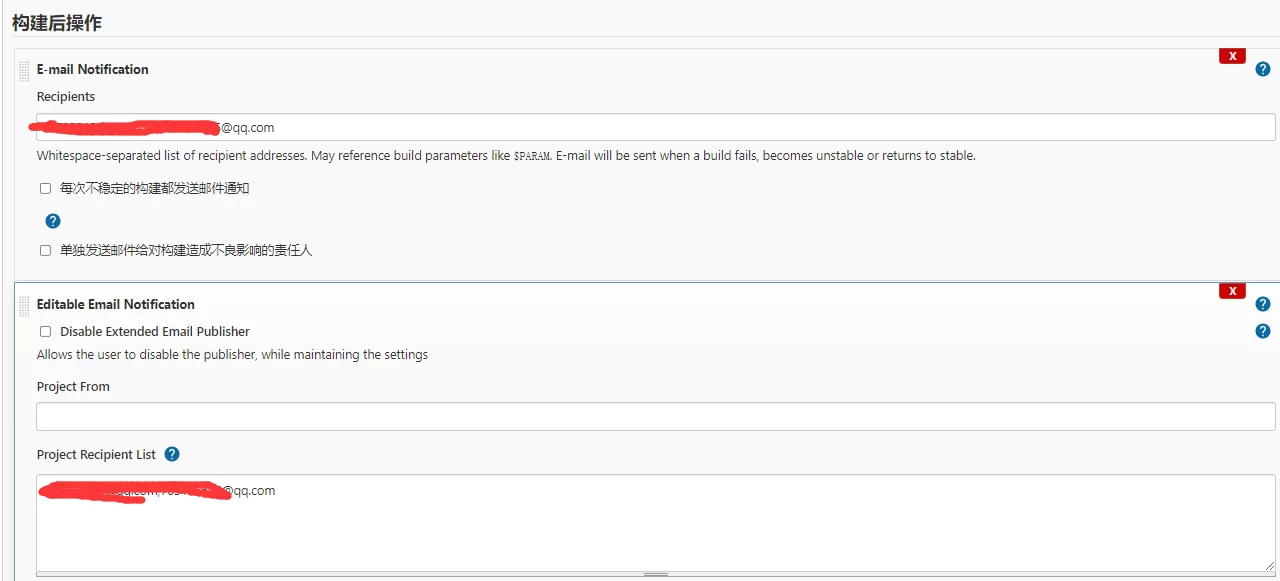
Build failure notification problem
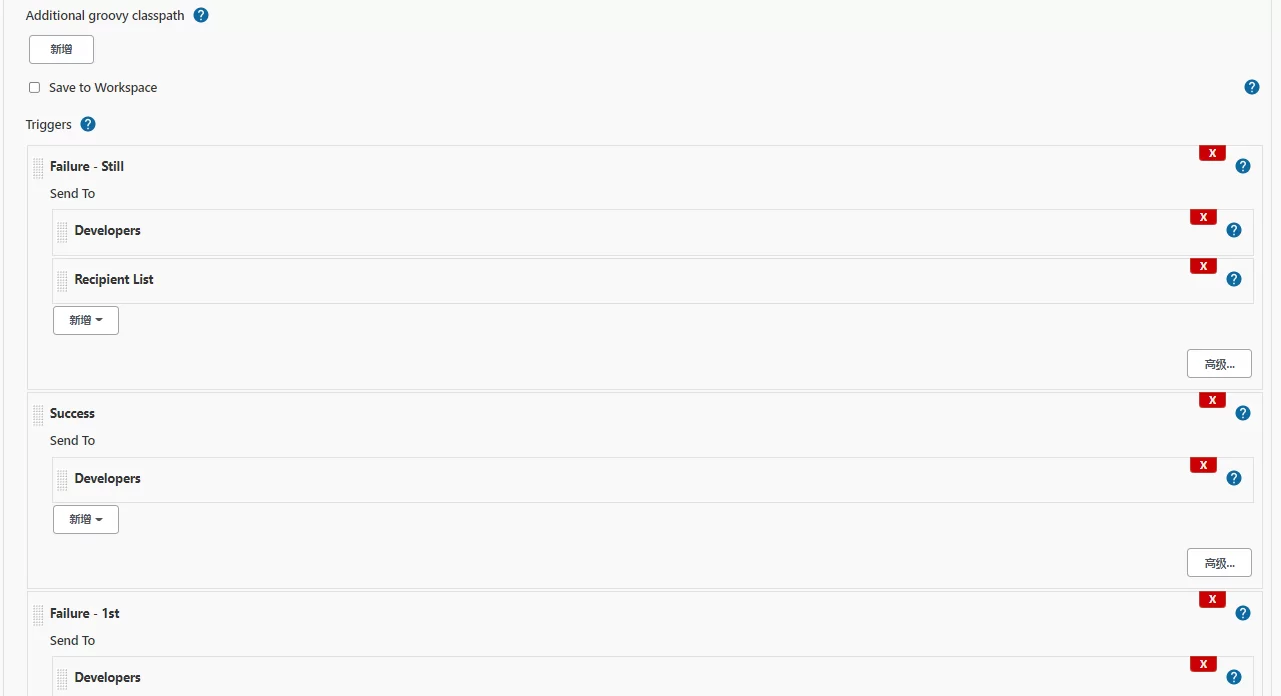
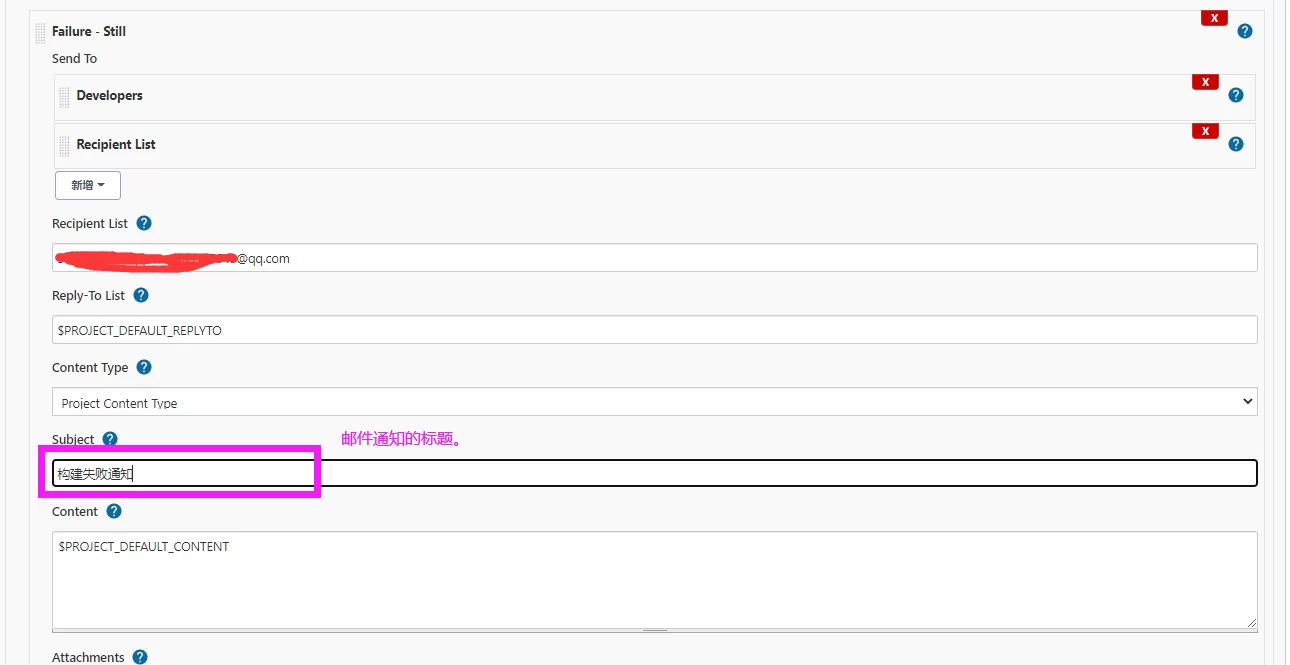
I’m using email to notify me that the build fails, and I only need to install the email plug-in and configure it. This part is relatively simple, just configure it as shown in the figure below. Of course, you can configure it more finely.
More refined mail notification configuration:
Click Advanced in the figure above to make more detailed settings, as shown in the figure below, just see for yourself.
The above is a summary of some experience about using jenkins to realize the continuous integration and automatic deployment of the ancient website. I hope to help friends in need.


