asp.net mvc website deployment Jexus guide, Recently, I have been working on deploying the asp.net mvc website on Jexus to solve some requests from customers. Because the project is composed of a mixed website of asp.net webform and asp.net mvc, the website is being migrated from the Windows IIS server to Centos Jexus encountered pits that were not, in short, they lay flat one by one.
Before you start, you need to install the Centos server. Because various management operations of the Centos server are performed using the command line (terminal), in order to manage the Centos server more conveniently, you can use aapanel to perform server management operations.

Install the aapanel for centos
aapanel is a visual web panel for managing Linux servers. After installing this panel, you can complete server management directly on the browser, such as website deployment, database installation, port opening or disabling, timing tasks, backups, file management, etc.
Chinese official website: www.bt.cn
English official website: www.aapanel.com
I recommend installing the English version, because you don’t need to register an account to use it. When using it for the first time, log in to the Centos server (other servers are similar, such as Ubuntu, Debian, etc.) using a client such as putty, and then execute the following command to install it.
Linux Panel Installation Command
aaPanel is developed based on Centos, we recommend using Centos to install it
Centos:
yum install -y wget && wget -O install.sh http://www.aapanel.com/script/install_6.0_en.sh && bash install.sh
asp.net mvc website deployment Jexus
The experimental Centos/Ubuntu/Debian/Fedora installation command supports ipv6. Note that this command is executed with root privileges (Centos8 is supported)
curl -sSO http://www.aapanel.com/script/new_install_en.sh && bash new_install_en.sh
Ubuntu/Deepin :
wget -O install.sh http://www.aapanel.com/script/install-ubuntu_6.0_en.sh && sudo bash install.sh
Debian :
wget -O install.sh http://www.aapanel.com/script/install-ubuntu_6.0_en.sh && bash install.sh
Note: You must install aapanel for a new system that has not installed other environments such as Apache/Nginx/php/MySQL. It is recommended to install aapanel on a system that uses centos 8.X
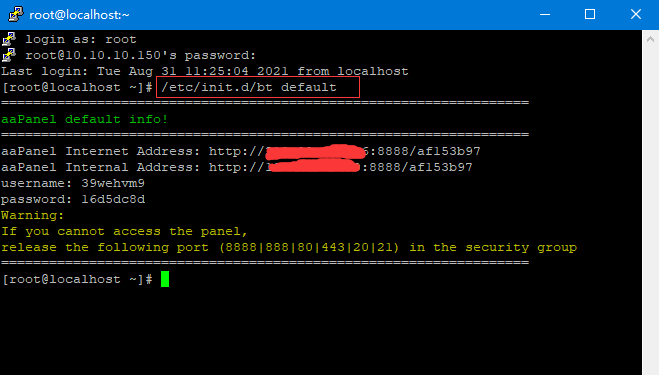
After aapanel is installed, there are aapanel’s login entry address, user name, password and other information in the final prompt text. You need to record it, copy it and save it directly. The user name and password can be modified in aapanel. If you forget the user name and password and other information, please use SSH (such as putty) to log in to the server, and execute the following commands to see the login address, user name, password and other information.
View the aapanel login entry, user name, password command:
/etc/init.d/bt default
Jexus installation
Just install the latest version of Jexus. It should be noted that installing Jexus needs to distinguish between the X86_64 system and the ARM64 system. Like some cloud servers, the ARM64 system may be used, so you need to pay attention. When installing Jexus, execute the following command:
X86_64 system
The command to install the standalone version of jexus is:
curl https://jexus.org/release/x64/install.sh|sh
ARM64 system
The command to install the standalone version of jexus is:
curl https://jexus.org/release/arm64/install.sh|sh
Asp.net mvc website deployment Jexus
The asp.net webform website and asp.net mvc website cannot be deployed across platforms. The Jexus installed in the previous step comes with a Linux mono runtime to support .net programs, so you can use the website programs developed by .net Deploy to a Linux server, but it should be noted that Mono does not support the latest .net environment and needs to be downgraded to compile and release. After testing, especially the reference library of mvc, you need to be careful not to use the latest version. The specific reference library and version that can be used are as follows:
MVC reference library version
System.Net.Http.Formatting—-5.2.4
System.Web.Mvc—-5.2.4
System.Web.Http—-5.2.4
System.Web.WebPages.Razor—-3.0.0
Other matters needing attention
URL address (route) and static resource address are strictly case sensitive
Does not support sets of applications under virtual directories (to be mentioned separately later)
The file path is based on Linux, Win path such as “D:\” is not supported
Configuration file update
The system.web configuration node is updated to solve the problem of System.Net.Http.
<compilation debug="true" targetFramework="4.7.2">
      <assemblies>
        <add assembly="System.Net.Http, Version=4.0.0.0, Culture=neutral, PublicKeyToken=b03f5f7f11d50a3a" />
      </assemblies>
</compilation>
asp.net mvc website deployment Jexus
Set of applications under virtual directory
On the Windows server, the deployment website can nest applications under the virtual directory, as shown in the following figure:
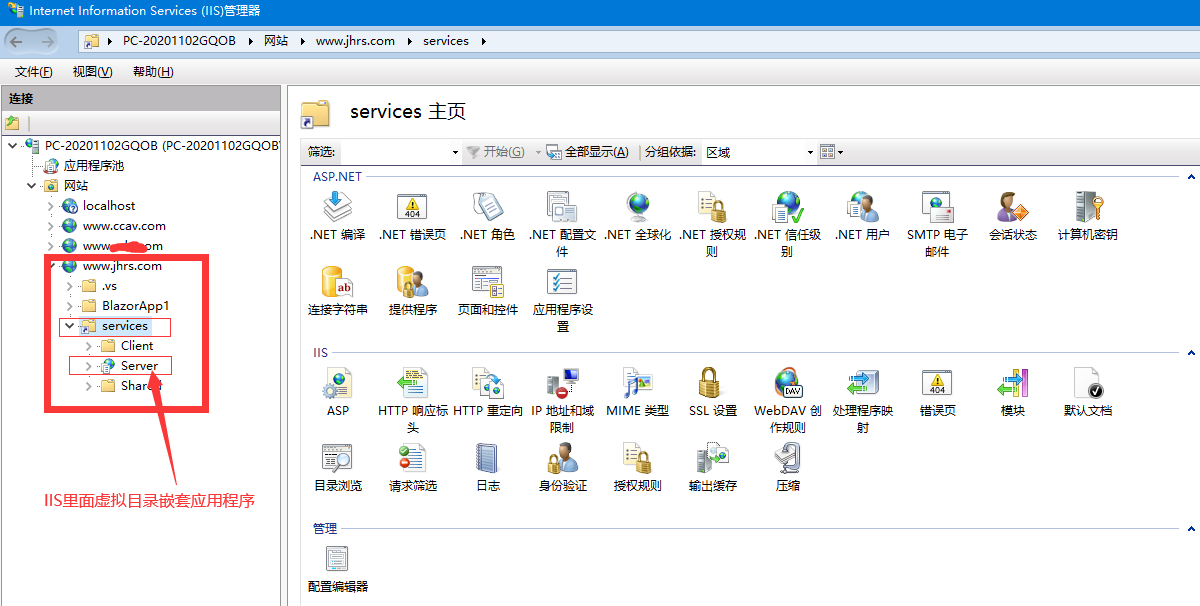
The uploadserver in the above figure is an application nested into the virtual directory of service. If you want to access the page in uploadserver, the request address is:
https://jhrs.com/service/uploadserver
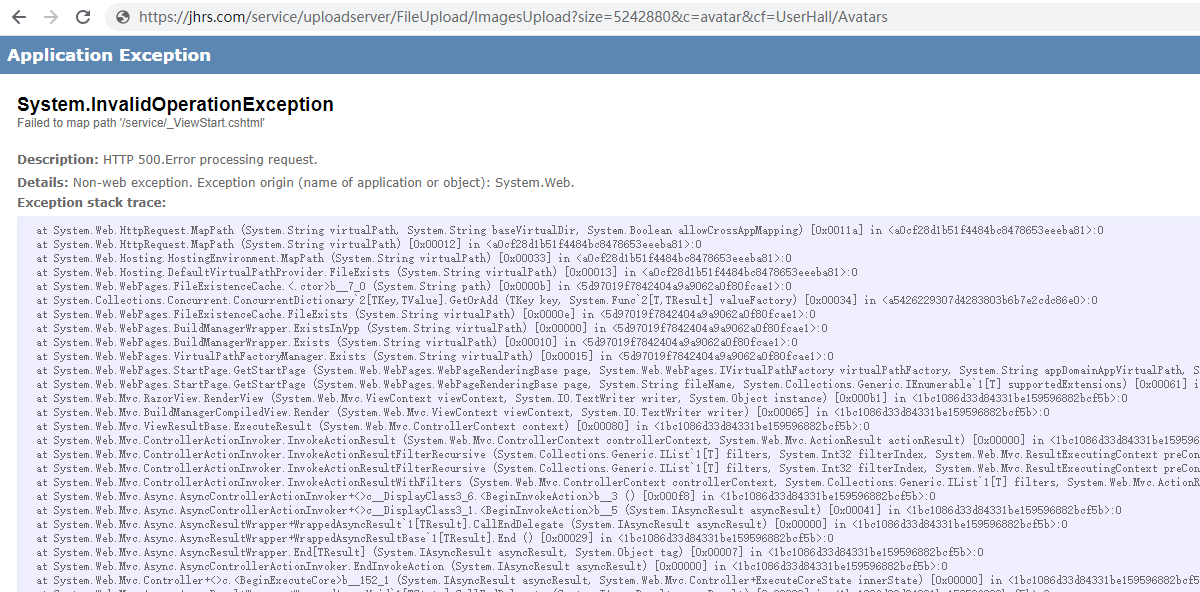
After deploying uploadserver to Jexus, if /service/uploadserver this link style is still maintained , and the website is developed using asp.net mvc, there will be a problem that the root directory of the website cannot be located correctly and System.InvalidOperationException an error will be reported . As shown below:
To solve this problem, we need to start from two aspects:
First: Configure the website in the Jexus siteconf file, do not configure it Second-level or two-segment path. The following figure shows the original configuration.
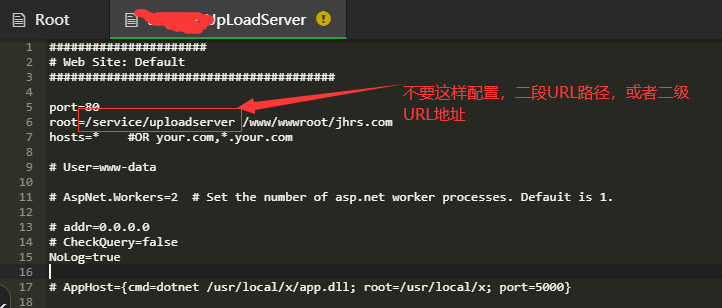
You only need to modify the configuration of the above figure One-level or one-segment path to. As shown below:
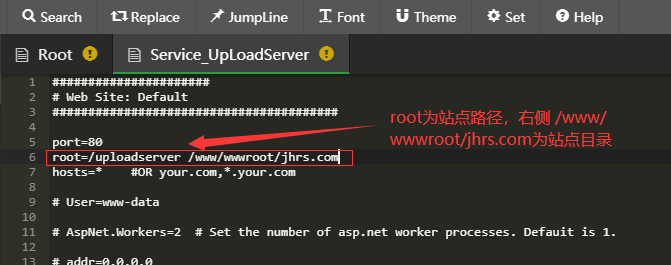
Second: Configure the reverse proxy, find the root file in the Jexus siteconf and modify it, and add the node as shown in the figure below to perform the reverse proxy.reproxy=/service/uploadserver https://jhrs.com/uploadserver
The one on the left reproxy=/service/uploadserver shows that when the requested address matches https://jhrs.com/service/uploadserver , it is actually https://jhrs.com/uploadserver the address requested by the reverse proxy for the server . If you configure the nginx reverse proxy, this is not difficult to understand.
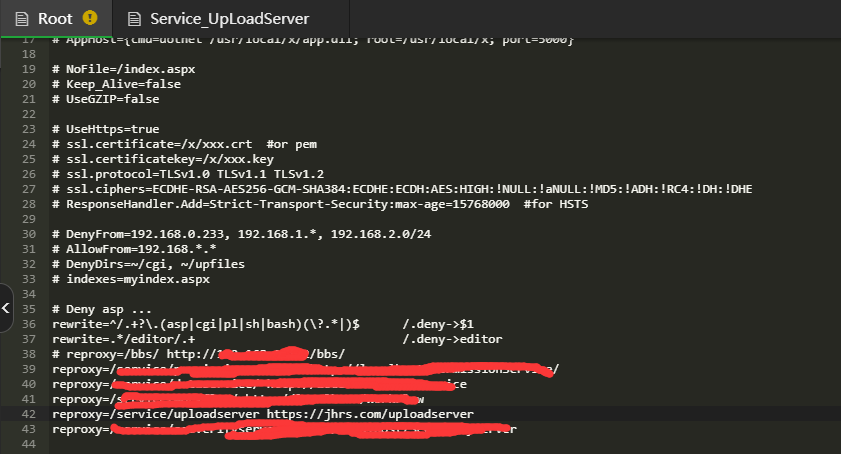
The reverse proxy can keep the same URL address as before the migration, so there is no need to modify any code to keep the request interface or URL consistent.
Webform deployment considerations
If it is empty or encountered, add it again.


